Azure Machine Learning is a cloud service for accelerating and managing the machine learning project lifecycle.
The image below shows a high-level architecture of Azure Machine Learning and the components included in the workspace:

Once you have a Workspace deployed in your Azure subscription, you can start working on your own Azure Machine Learning Service, and the first step is to add compute instances and compute clusters as needed for your model.
Think of a compute instance as a managed cloud workstation for you to work with your machine learning model. This is a managed virtual machine that will include some pre-build functionality so that you can focus on your machine learning development environment.
A compute instance will be integrated on top of the Workspace and Azure Machine Learning Studio. You can build and deploy models using integrated notebooks and tools like Jupyter, JupyterLab, Visual Studio Code, and RStudio.
Create a compute instance
Compute instances can be created on-demand using your workspace in Azure Machine Learning Studio. You can create compute instances using the Azure Portal, ARM templates, using the Azure Machine Learning SDF, using the CLI extension for AML, and using Bicep.
Now let’s see how you can create an Azure Machine Learning Compute Instance using Azure Bicep.
1. Pre-requisites
There are two pre-requisites:
- Create a resource group.
- Before you create, compute instances, ensure you have a workspace. You can refer to this article to create a workspace using Bicep.
Once you have your Azure Machine Learning Workspace, grab the following information:
- Workspace name: The name of the Azure Machine Learning workspace to which compute instance will be deployed
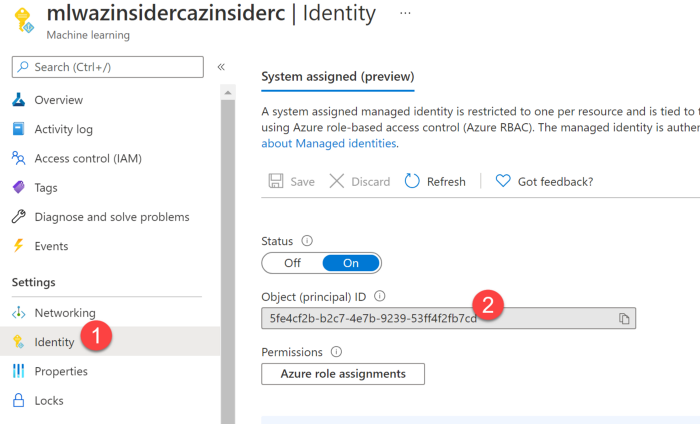
- Object ID: Azure AD object id of the user to which compute instance is assigned. You can get this information from the Azure Machine Learning Workspace you deployed. Then go to the identity option and get the Object ID as shown below:

2. Deploy Bicep file to create an Azure Machine Learning Compute Instance
The code shows the definition of the Bifep file to create an Azure Machine Learning Compute Instance:
@description('Specifies the name of the Azure Machine Learning workspace to which compute instance will be deployed')
param workspaceName string
@description('Specifies the name of the Azure Machine Learning compute instance to be deployed')
param computeName string
@description('Location of the Azure Machine Learning workspace.')
param location string = resourceGroup().location
@description('The VM size for compute instance')
param vmSize string = 'Standard_DS3_v2'
@description('Name of the resource group which holds the VNET to which you want to inject your compute instance in.')
param vnetResourceGroupName string = ''
@description('Name of the vnet which you want to inject your compute instance in.')
param vnetName string = ''
@description('Name of the subnet inside the VNET which you want to inject your compute instance in.')
param subnetName string = ''
@description('AAD tenant id of the user to which compute instance is assigned to')
param tenantId string = subscription().tenantId
@description('AAD object id of the user to which compute instance is assigned to')
param objectId string
@description('inline command')
param inlineCommand string = 'ls'
@description('Specifies the cmd arguments of the creation script in the storage volume of the Compute Instance.')
param creationScript_cmdArguments string = ''
var subnet = {
  id: resourceId(vnetResourceGroupName, 'Microsoft.Network/virtualNetworks/subnets', vnetName, subnetName)
}
resource workspaceName_computeName 'Microsoft.MachineLearningServices/workspaces/computes@2021-07-01' = {
  name: '${workspaceName}/${computeName}'
  location: location
  properties: {
    computeType: 'ComputeInstance'
    properties: {
      vmSize: vmSize
      subnet: (((!empty(vnetResourceGroupName)) && (!empty(vnetName)) && (!empty(subnetName))) ? subnet : json('null'))
      personalComputeInstanceSettings: {
        assignedUser: {
          objectId: objectId
          tenantId: tenantId
        }
      }
      setupScripts: {
        scripts: {
          creationScript: {
            scriptSource: 'inline'
            scriptData: base64(inlineCommand)
            scriptArguments: creationScript_cmdArguments
          }
        }
      }

    }
  }
}
Now we will define the parameters file.
3. Parameters file.
The code below shows the definition of the three parameters we will pass on during deployment time:
{
    "$schema": "https://schema.management.azure.com/schemas/2019-04-01/deploymentParameters.json#",
    "contentVersion": "1.0.0.0",
    "parameters": {
        "workspaceName": {
            "value": "YOUR-WORKSPACE-NAME"
        },
        "computeName": {
            "value": "YOUR-COMPUTE-NAME"
        },
        "objectId": {
            "value": "YOUR-WORKSPACE-OBJECT-ID"
        }
    }
}
Now that we have both files, the Bicep file that creates an Azure Machine Learning Compute Instance and the parameters file, we will execute the deployment using the command below:
$date = Get-Date -Format "MM-dd-yyyy"
$deploymentName = "AzInsiderDeployment"+"$date"
New-AzResourceGroupDeployment -Name $deploymentName -ResourceGroupName AzInsiderML -TemplateFile .\main.bicep -TemplateParameterFile .\azuredeploy.parameters.json -c
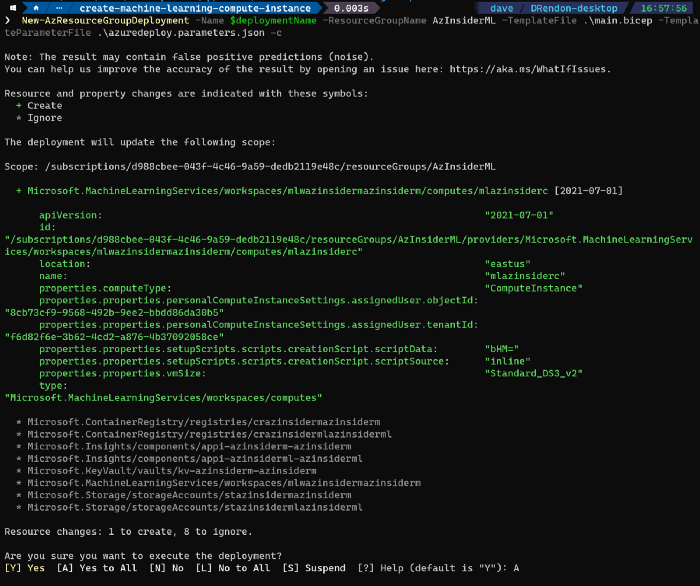
Note we add the flag -c at the end to have a preview of the deployment as shown below:

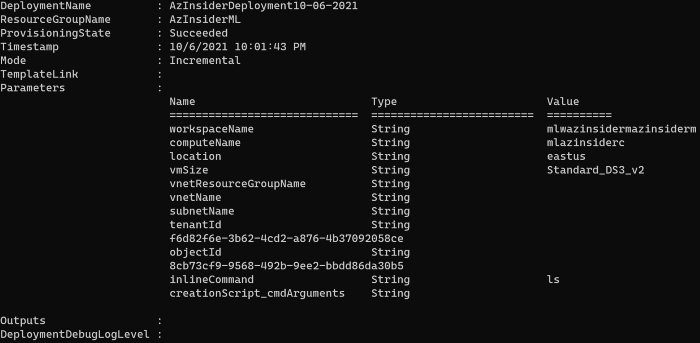
Once the validation is complete, let’s execute the deployment. The figure below shows the output from this deployment.

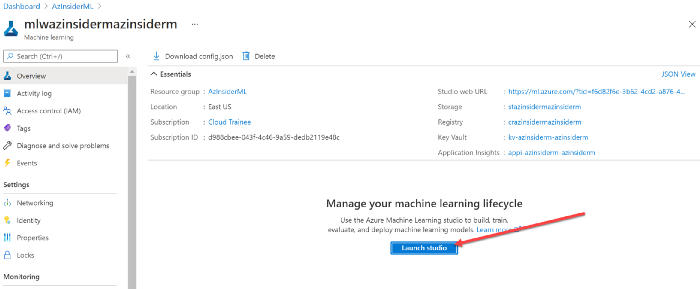
To verify the deployment, you can go to the Azure Portal, then select your workspace and select the Launch Studio option as shown below:

You will be redirected to the Microsoft Azure Machine Learning Studio portal, and you will see a notification that a new compute resource has been provisioned, as shown below:

These compute resources can run jobs securely inside a virtual network without the need for opening SSH ports.
You can reuse the compute instances as a development workstation or as a compute target for training. It is possible to leverage multiple compute instances and attach them to your workspace.
I recommend you the following resources:
