The way data is streamed from the server to the client is standardized by SSE(server-sent events).The SSE API is used for automatic updates of web page from server.
Prior SSE API the web page have to check, if there were any updates available, but with SSE API the updates come automatically.
SSE API: Check Browser Support
if(typeof(EventSource) !== "undefined") {
  // Some code.....
} else {
  // Sorry! No server-sent events support
}
Server Sent Event(SSE) Notifications
Now lets discuss two files for SSE , one is for receiving the data and other is for sending the server side data.
- Receive SSE Notifications.
- Server-side event stream.
Receive SSE Notifications
To receive the notification of SSE, EventSource object is used. Lets see an example to understand it more clearly.
var source = new EventSource("sent_sse.php");
  source.onmessage = function(event) {
    document.getElementById("res").innerHTML += event.data + "<br>";
  };
Working:
In the above code there are three main steps except checking the browser support :
- Create EventSource object for receiving notifications from server, for this embed the URL of page sending updated notifications.
- Now for each notification onmessage() event will occur to get the message.
- The next step is to put the message in element particularly allocated for it, such as in the above example there is <div> with id= res.
Server-side event stream
Now lets discuss the file which will sent the server side updates, the extension of this file can be php/asp.
The syntax for the server-side event stream is simple. Set the header “Content-Type” to “text/event-stream.” You can now begin sending event streams.
Code in PHP (sent_sse.php):
<?php
header('Content-Type: text/event-stream');
header('Cache-Control: no-cache');

$date = date('r');
echo "data: The server time and date is: {$date}\n\n";
flush();
?>
Working:
- Set the “Content-Type” header to “text/event-stream.
- The next step is to make sure that page should not make caches.
- Now after performing operation send the data and make sure that data to send should start from “data: “.
- Now the last step is to flush the data back to webpage using flush().
Note: Flush() sends all production out right away, without waiting for the script to finish, and it can be called as many times as you want.
Now we have discussed working of both files in detail. You can try the above code to understand it more well that how date and time notification is updating automatically.
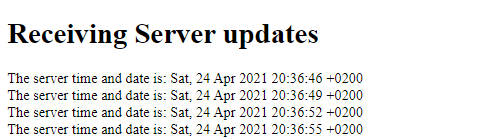
The final output of above code is below: